Raspberry Pi Router & Firewall: How-To Guide
Are you tired of sluggish internet speeds, vulnerable network security, and exorbitant router costs? Transforming your Raspberry Pi into a router with a robust firewall is a powerful and surprisingly accessible solution, offering unparalleled control and customization over your home network, all while bolstering its defenses. This guide delves into the intricacies of configuring your Raspberry Pi to act as a secure and efficient router, providing a comprehensive walkthrough for both novice and experienced users.
The allure of a Raspberry Pi router extends far beyond mere cost savings. Standard, off-the-shelf routers often offer limited customization options and can become quickly outdated. By contrast, a Raspberry Pi router empowers you to tailor your network to your exact needs, providing features and security protocols that are often absent in commercial offerings. This includes the ability to implement advanced firewall rules, monitor network traffic in real-time, and even block specific websites or content, granting you unparalleled control over your digital environment. Moreover, the open-source nature of the Raspberry Pi ecosystem fosters constant innovation, ensuring your router remains at the forefront of network security and functionality. The journey to a customized, secure network starts now.
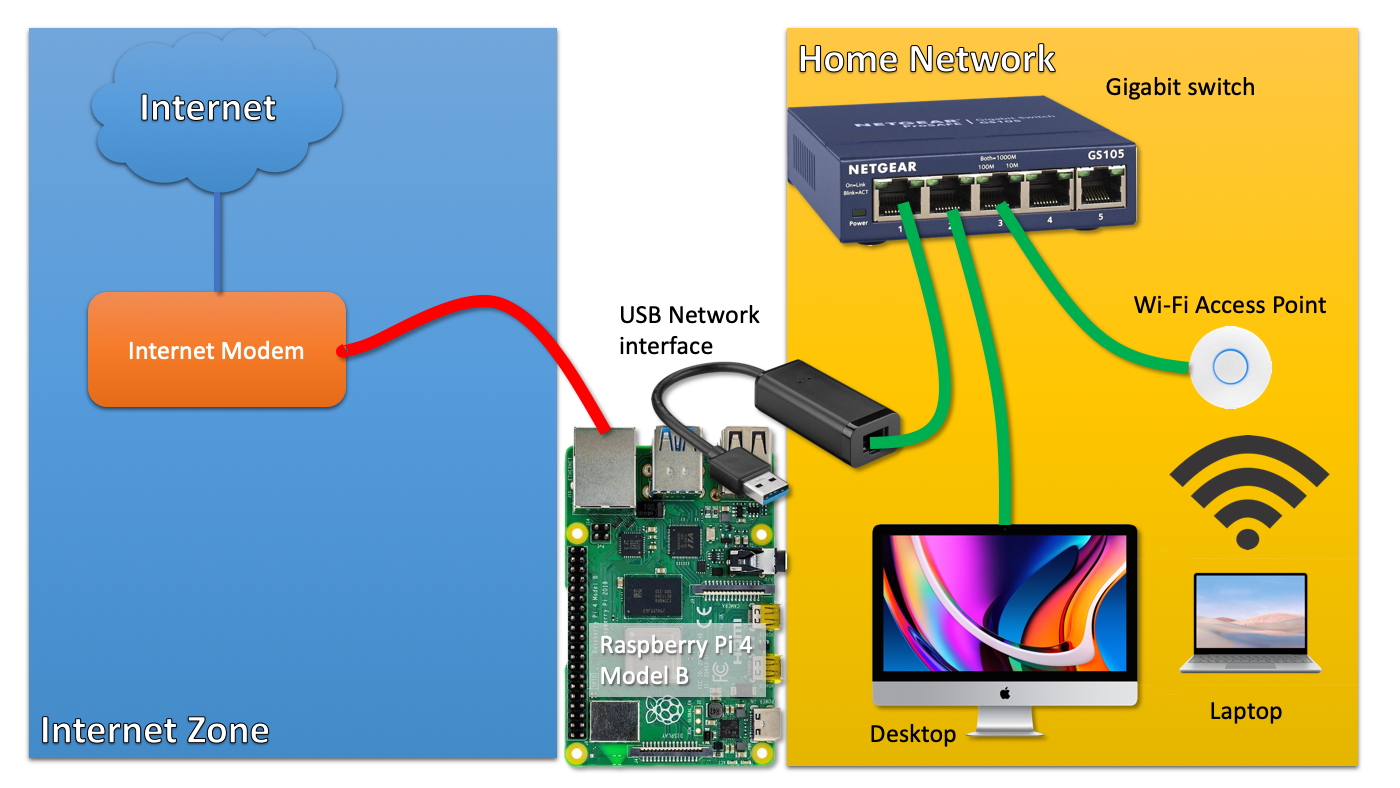
Before embarking on this project, it's essential to gather the necessary components. You'll need a Raspberry Pi (any model from Pi 3B onwards is recommended, with a Pi 4 offering the best performance), a microSD card (at least 8GB, preferably 16GB or more) for the operating system, a power supply for your Raspberry Pi, an Ethernet cable to connect your Pi to your modem or existing network, and a second Ethernet cable or a USB Ethernet adapter if your Raspberry Pi lacks two built-in Ethernet ports (essential for routing traffic). Consider a case for your Pi to protect it and improve airflow. Lastly, you'll need a computer to flash the operating system onto your microSD card, and a monitor, keyboard, and mouse for the initial setup of the Raspberry Pi. While a screen and peripherals aren't always needed after the initial setup, they can make the initial configuration process easier. Once you have these essentials, you're ready to proceed.
The next crucial step involves selecting and installing the appropriate operating system. Several Linux distributions are well-suited for this task, but OpenWrt and Raspberry Pi OS (formerly Raspbian) are excellent choices. OpenWrt is specifically designed for embedded devices like routers and offers a streamlined and lightweight experience, with a focus on networking features. Raspberry Pi OS, while more general-purpose, provides a user-friendly environment and a wide array of software packages, making it a solid option for beginners. The choice depends on your preference and technical familiarity, with OpenWrt offering more advanced router-specific features and Raspberry Pi OS providing a more general-purpose experience. The installation process is similar for both, involving downloading the OS image from the respective website, flashing it onto your microSD card using a tool like BalenaEtcher or Rufus, and then inserting the card into your Raspberry Pi.
Once the operating system is installed, it's time to configure the network interfaces. This involves assigning static IP addresses to the Ethernet ports on your Raspberry Pi. One port will be connected to your modem (or existing network) and will be the WAN (Wide Area Network) interface, responsible for receiving an IP address from your internet service provider (ISP). The other port will be the LAN (Local Area Network) interface, responsible for providing IP addresses to devices on your home network. Configuring the WAN interface typically involves setting it to obtain an IP address automatically using DHCP (Dynamic Host Configuration Protocol), which your ISP typically provides. Configuring the LAN interface requires assigning a static IP address to the Pi itself (e.g., 192.168.1.1), setting up a DHCP server on the Pi to assign IP addresses to connected devices (e.g., 192.168.1.100 to 192.168.1.200), and defining a subnet mask (e.g., 255.255.255.0). This initial interface configuration is the foundation upon which the entire router is built. The exact steps vary depending on the operating system you've chosen, but online tutorials and documentation will guide you through each process. OpenWrt typically offers a web-based interface for easy configuration, while Raspberry Pi OS often relies on command-line tools like `ifconfig` and `route` or network manager based graphical interface, or configuring files.
With the network interfaces configured, the next step is to enable IP forwarding. This is the core mechanism that allows your Raspberry Pi to act as a router, by forwarding network traffic between the WAN and LAN interfaces. IP forwarding can be enabled using the `sysctl` command in Linux. You'll need to modify the `/etc/sysctl.conf` file to permanently enable IP forwarding across reboots. Specifically, you'll need to uncomment or add the line `net.ipv4.ip_forward=1`. After making the change, you can apply it by running `sudo sysctl -p`. IP forwarding allows the Raspberry Pi to route traffic between the WAN and LAN interfaces, and it's the very essence of the routers functionality. Once enabled, the Raspberry Pi can now forward traffic between the internet and your local network, albeit without any security measures in place.
Firewall configuration is paramount for securing your network. A firewall acts as a gatekeeper, controlling which network traffic is allowed to pass through the router. Linux systems like OpenWrt and Raspberry Pi OS come with firewall tools, such as `iptables` or `nftables`, that allow you to define rules to filter traffic based on source and destination IP addresses, ports, protocols, and other criteria. Basic firewall rules often include blocking all incoming connections by default and allowing only specific, necessary traffic, such as HTTP (port 80) and HTTPS (port 443) for web browsing, and SSH (port 22) for secure remote access, only if you intend to access your Raspberry Pi router remotely. More advanced configurations involve port forwarding (allowing specific traffic to reach devices on your local network), and configuring intrusion detection systems (IDS) to identify and mitigate malicious activity. A well-configured firewall protects your network from external threats, preventing unauthorized access and mitigating potential security vulnerabilities. Understanding and implementing a strong firewall is the cornerstone of a secure home network.
To facilitate internet access for devices on your LAN, youll need to configure Network Address Translation (NAT). NAT allows multiple devices on your local network to share a single public IP address, which your Raspberry Pi obtains from your ISP. This is generally enabled by default in most distributions and the underlying functionality relies on `iptables`. You might need to configure NAT if its not already set up, as its crucial for allowing your devices to access the internet. The specific commands to configure NAT will vary depending on the chosen OS and the underlying firewall tool, such as `iptables` or `nftables`. Essentially, you'll need to configure a rule that allows all traffic from your LAN interface to be masqueraded, making it appear as if it originates from the Raspberry Pi's WAN IP address. This is what enables your devices on the LAN to access the internet through the router.
DHCP configuration is the process of setting up your Raspberry Pi to automatically assign IP addresses, subnet masks, default gateways, and DNS servers to devices that connect to your LAN. This simplifies network administration, as you don't have to manually configure the network settings on each device. Most distributions offer DHCP server implementations, such as `dnsmasq`. Configuration typically involves specifying the IP address range to be assigned to devices (e.g., 192.168.1.100-192.168.1.200), the subnet mask (e.g., 255.255.255.0), the default gateway (your Raspberry Pi's LAN IP address), and the DNS server addresses. The DNS servers are responsible for translating domain names (e.g., google.com) into IP addresses, enabling web browsing. This automation streamlines network management, making it easy to add new devices to your network. Both OpenWrt and Raspberry Pi OS offers tools to manage DHCP settings, typically through configuration files or a web-based interface, depending on the chosen system.
Testing your router is crucial to ensure that it functions as expected. After completing the initial setup, connect a device to your LAN (e.g., a computer or smartphone) and verify that it can access the internet. Browse different websites and test various applications to confirm connectivity. Check that other devices can connect to the same network. Examine the firewall logs to confirm that the expected traffic is being allowed and that any unwanted traffic is being blocked. Check for any configuration errors or misconfigurations. Verify that your devices receive the correct IP addresses and DNS settings automatically, through DHCP. If you encounter any issues, revisit your configuration settings, consult online tutorials, and troubleshoot the problems until your Raspberry Pi router functions reliably. This testing phase is vital for ensuring a secure and functional network.
Advanced configurations can further enhance the capabilities of your Raspberry Pi router. This includes setting up a VPN (Virtual Private Network) server to encrypt your network traffic and protect your privacy when you're browsing the internet. You can also configure Quality of Service (QoS) to prioritize certain types of network traffic (e.g., video streaming or online gaming), ensuring a smoother and more responsive experience. Setting up a DNS server (e.g., Pi-hole) to block ads and trackers can also be implemented, enhancing your browsing experience. Other advanced options are also available, like creating a guest network, which allows you to provide internet access to guests without compromising the security of your primary network. These advanced features, along with additional fine-tuning, allow you to maximize the potential of your Raspberry Pi router and personalize it to your exact needs.
Securing your Raspberry Pi router is an ongoing process. Keeping the operating system and all installed software up to date is paramount. Regularly apply security patches and updates to address any vulnerabilities. Change the default passwords for all accounts, including the root account, and implement strong, unique passwords. Consider disabling unnecessary services that could potentially be exploited by attackers. Regularly monitor your firewall logs for suspicious activity and configure intrusion detection and prevention systems to identify and mitigate attacks. Perform regular security audits to assess the security posture of your router and identify any areas for improvement. Network security is a continuous process, so stay updated on the latest security threats and best practices. Regularly reviewing and updating your router's configuration and employing these security measures are key to maintaining a robust and secure home network environment.
Troubleshooting common issues is an inevitable part of setting up and maintaining a Raspberry Pi router. If you can't connect to the internet, verify your Ethernet connections, check the IP addresses and DNS settings, and ensure that IP forwarding and NAT are correctly configured. If the internet speed is slow, check your internet connection speed, and review your firewall rules to ensure no traffic is being inadvertently blocked. If you experience connectivity issues with specific devices, check their network settings and ensure that they can obtain an IP address from the DHCP server. Carefully analyze the error messages and consult online forums and documentation for guidance. Experiment with different configurations. Troubleshooting is an iterative process, so systematically identify and resolve the root cause of any problem to ensure your router is running smoothly. The wealth of online resources, including forums and documentation, provides the necessary assistance to diagnose and resolve issues.
In conclusion, transforming your Raspberry Pi into a router with a firewall presents a compelling alternative to off-the-shelf solutions, offering unparalleled control, security, and customization. By following the steps outlined in this guide, you can configure your Raspberry Pi to act as a secure and efficient router, tailored to your unique needs. The advantages encompass heightened network security, improved performance, and the flexibility to adapt your network environment. While the initial setup may require some technical knowledge, the long-term benefits are considerable, empowering you to take control of your digital experience and safeguard your online privacy. It is a worthwhile undertaking for anyone looking to understand and manage their network more effectively.


